Django is a high-level Python Web framework that encourages rapid development and clean, pragmatic design. It has been more than 10 years since created, and released its 1.10 version few months ago. During that time it proved how stable it is with lots of massive projects(such as Instagram, Pinterest, and more) which are based on it. Project I’m currently working on are based on this too. I have small experience on RoR and NodeJS too. Each of them has pros and cons, and are already being used on services in world. But one thing I think the strong point of Django is, it is written in Python. It means it can use variable python packages/libraries. This is, I think, it is more better point than other frameworks.
This is simple note about creating API server based on Django. Open the terminal and scaffold project.
{% highlight bash %} {% raw %} $ django-admin startproject api_server $ cd api_server $ pip install django … $ python manage.py migrate Operations to perform: Apply all migrations: admin, contenttypes, sessions, auth Running migrations: Rendering model states… DONE Applying contenttypes.0001_initial… OK Applying auth.0001_initial… OK Applying admin.0001_initial… OK Applying admin.0002_logentry_remove_auto_add… OK Applying contenttypes.0002_remove_content_type_name… OK Applying auth.0002_alter_permission_name_max_length… OK Applying auth.0003_alter_user_email_max_length… OK Applying auth.0004_alter_user_username_opts… OK Applying auth.0005_alter_user_last_login_null… OK Applying auth.0006_require_contenttypes_0002… OK Applying auth.0007_alter_validators_add_error_messages… OK Applying sessions.0001_initial… OK $ python manage.py startapp apis $ python manage.py runserver Django version 1.9.7, using settings ‘api_server.settings’ Starting development server at http://127.0.0.1:8000/ Quit the server with CONTROL-C. {% endraw %} {% endhighlight %}
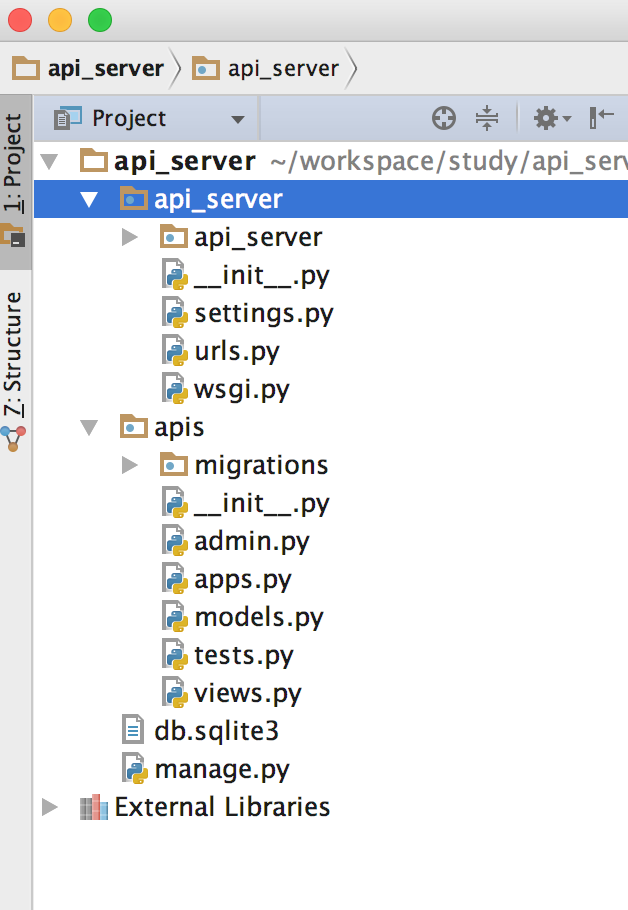
This is the basic way to build, start default django web server. Your project directory tree will be like this.

Now we will use Django REST framework to implement API server. We can also make without this, but it has lots of useful features for serialization, authentication, and more. Use PyPI for install these.
{% highlight bash %} {% raw %} $ pip install djangorestframework # Install REST framework $ pip install markdown # Markdown support for the browsable API. $ pip install django-filter # Filtering support {% endraw %} {% endhighlight %}
Let’s add installed packages in project. Find settings.py file and put 2 line for this.
{% highlight python %} {% raw %} … INSTALLED_APPS = [ ‘django.contrib.admin’, ‘django.contrib.auth’, ‘django.contrib.contenttypes’, ‘django.contrib.sessions’, ‘django.contrib.messages’, ‘django.contrib.staticfiles’,
#Add these for REST framework
'rest_framework'
] … {% endraw %} {% endhighlight %}
Now our project is prepared. Before going on, I’ll make super user account. This will be used for authentication.
{% highlight bash %} {% raw %} $ python manage.py createsuperuser Username (leave blank to use ‘…’): admin Email address: admin@gmail.com Password: Password (again): Superuser created successfully. {% endraw %} {% endhighlight %}
There are several things to keep in mind when implementing web API service. Django REST framework helps us to concern more less on details and make us to focus on functions which API offers. For example, we could use ‘Serializer’ in this framework to serialize/deserialize API more simple. First, let’s try to get account list. There would be 1 account we just created with ‘createsuperuser’ command. Write below in ‘apis/serializer.py’
{% highlight python %} {% raw %} from django.contrib.auth.models import User, Group from rest_framework import serializers
class UserSerializer(serializers.ModelSerializer): class Meta: model = User fields = (‘username’, ’email’, ‘groups’)
{% endraw %} {% endhighlight %}
This is serializer for model in user list. It serialize fields ‘username’,’email’, ‘group’ column in ‘User’ database. Then go on to ‘apis/views.py’
{% highlight python %} {% raw %} from django.contrib.auth.models import User from rest_framework import viewsets from apis.serializers import UserSerializer
class UserViewSet(viewsets.ModelViewSet):
queryset = User.objects.all().order_by('-date_joined')
serializer_class = UserSerializer
{% endraw %} {% endhighlight %}
‘UserViewSet’ inherits ‘ModelViewSet’ in rest framework. It is for representing values in model. As in code, by defining ‘serializer_class’, it will serialize ‘User’ objects. Now let’s run this server and see how it works. Open another terminal and call API. Now we need to define API url for get user list. This will be defined in ‘apis/urls.py’
{% highlight python %} {% raw %} from django.conf.urls import url, include from rest_framework.routers import DefaultRouter from apis.views import UserViewSet
router = DefaultRouter() router.register(r’users’, UserViewSet)
urlpatterns = [ url(r’^’, include(router.urls)), ] {% endraw %} {% endhighlight %}
Router can be defined with ‘DefaultRouter’. By register viewsets with name ‘users’, this will be linked in ‘http://your.api.server.ip/users/'. Also, for secure service, we need to make this API only be accessible to admin user. Add some lines in ‘settings.py’.
{% highlight python %} {% raw %} REST_FRAMEWORK = { ‘DEFAULT_PERMISSION_CLASSES’: [ ‘rest_framework.permissions.IsAdminUser’, ] } {% endraw %} {% endhighlight %}
Now, try to call this API.
{% highlight bash %} {% raw %} $ curl -H ‘Accept: application/json; indent=4’ -u [username]:[password] http://127.0.0.1:8000/users/ { “count”: 1, “next”: null, “previous”: null, “results”: [ { “username”: “admin”, “email”: “admin@gmail.com”, “groups”: [] } ] } $ curl -H ‘Accept: application/json; indent=4’ http://127.0.0.1:8000/users/ { “detail”: “Authentication credentials were not provided.” } {% endraw %} {% endhighlight %}
Because we defined in serializer, we can see ‘groups’ key in result though it is empty. Also it returns no result when no account/password has been put in.